
Objectives:
- Make Your Own Animation
This project is adapted from a book entitled VB6 for Web Development by Rod Paddock
Creating Animation in Visual Basic
It is easy to create animation using Visual Basic. The basic idea is that you place a series of images on your form and then you control which image is displayed in the order you wish. Creating animation in Visual Basic starts with using the timer. The technique is simple. You place a series of images on your form. You set the visible property to FALSE on all but the first image. Then, the timer controls which image is visible by looping through the images. The effect is just like an animation flipbook. When the timer flips through the images fast enough, it looks like the image is moving.
Animation is made possible by two important programming principles: the loop and the control array. A loop is a part of the program which keeps repeating itself for as long as you tell it to do so. The flickering of an animation is nothing more than a series of images that are looping.
A control array is a special type of "shortcut" that you as a programmer can use to make the computer process faster. In Visual Basic, you automatically create a control array when you copy and paste the same object on your form. Let's say you have just made a picture box named "picture" and placed it on your form. If you copy and paste the picture again, Visual Basic will stop you and tell you that you already have a picture by that name. It then asks you if you wish to create a control array. If you go along and paste the picture, you will see that you have started to create a sequence that looks like this:
picture(0)
picture(1)
picture(2)
All that's happening here is that the computer is using the same name (picture) over and over with the addition of index numbers so that it can tell them apart. That's really all there is to creating a control array.
Now, the processor can operate more efficiently because the array allows the computer to refer to all the pictures (called elements) under the same name by referring to each element's index number. You may be thinking, "what's the big deal? Why bother creating a control array?" Imagine an animation that contained a thousand pictures--or ten thousand pictures--would you want to come up with different names for each? A video game can have hundreds of thousands of images. Without arrays, it would impossible to control all the images. Animation depends on using arrays, so it's important to get used to using them. Okay, let's create a simple 2D animation:
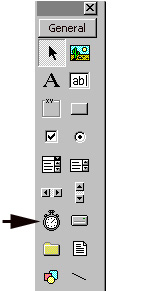
- Click the timer icon on the Visual Basic Toolbox.
- Click and drag the timer onto your form.
- Change the interval property of the timer to 150.
- Create an interesting shape on your form.
- Copy and paste the shape four times so that you have a total of five shapes. You will get a warning notice that you are about to create a control array. Click OK, because that's exactly what you want to do.
- Notice the names of the elements in your array. They will be automatically named:
shape1(0)
shape1(1)
shape1(2)
shape1(3)
shape1(4)
That's what an array looks like. They start counting at zero.
- Change each of the shapes so that they are all a little different. Arrange them in a circle on your form.
- Open up the code window by clicking view code. Use the drop-down menu to go to the section labeled general and type:
Dim increment As Integer
- After you type it, Then hit the enter key.
- Go into the Form Load section of the code and type:
shape1(0).Visible=True
shape1(1).Visible=False
shape1(2).Visible=False
shape1(3).Visible=False
shape1(4).Visible=False
increment = 0
- Open up the code for your timer and type:
Shape1(increment).Visible = False
If increment = 4 Then
increment = 0
Else
increment = increment + 1
End If
Shape1(increment).Visible = True
- Add a command button to your form.
- Change its name property to cmdStop.
- Change its caption to Stop.
- Double click the command button and type the following code:
Unload Me
- Run the program.
Each animation needs to have its own timer. You will also need to dim a separate increment variable for each in the general section of the code. For example:
dim increment as integer
dim increment2 as integer
You can repeat this as many times as you want.
You will also need to repeat the other code inside the form load and inside the timer. You will, however, need to adjust the code to match your new increment variable. You could just copy and paste and then change increment to increment2 each time its mentioned in the timer.
Also, you can make your array any size you wish, just adjust the number in your code to match, otherwise you'll get an error message.
You can also use pictures, but you have to copy and paste the picture first and then change the second picture so that you still have an array.
Assignment
- Add a new form to the master project.
- Name it frmAnimations.
- Create an animation.
- You may either create a total of five forms each with a different animation, or you may use just one form, but have five different timers with five separate animations on that one form. Use shapes on some and pictures on the others.
- Adjust the timer intervals from 1 to 1500 to adjust speeds. Remember it's measured in miliseconds so 1000 equals one second.
<< Back to Skyline